 |
|||
|
|
|||
|
Page Title:
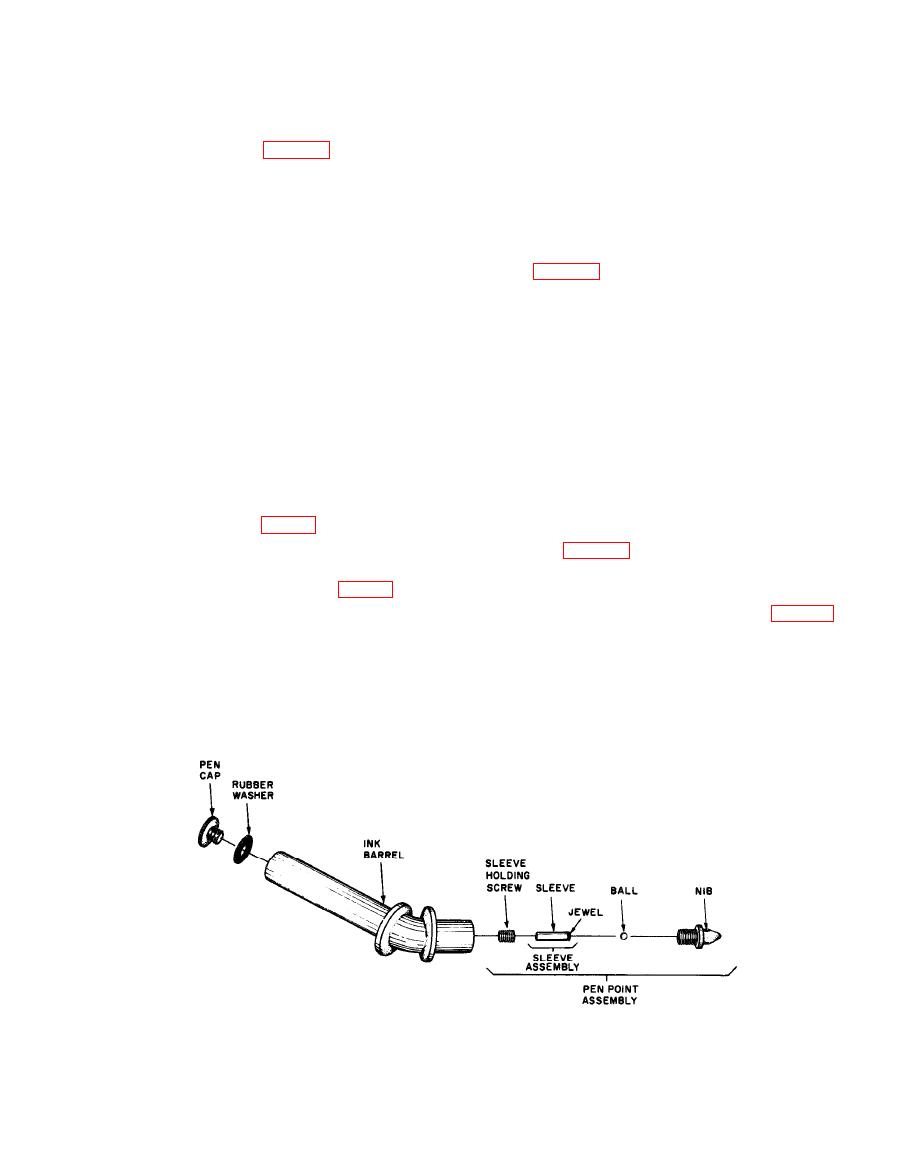
Figure 3-10. Pen, disassembled. |
|
||
| ||||||||||
|
|  TM 11-6660-204-25
(12) Replace the panel lamp assembly and
object. The ball may move off the paper
tighten the setscrews to secure the panel lamp
and get lost. Use brass tweezers to han-
assembly.
dle the ball.
c. Resembling Pen (fig. 3-10).
3-11. Clean, Lubricate, and Tighten
(1) Be sure that all parts of the pen are
Internal Recorder Components
thoroughly dry.
(2) Drop the ball into the nib.
it out of its drawer.
(3) Insert the jeweled end of the sleeve as-
sembly into the nib and gently tighten the screw
b. Open the recorder window and remove the
until the ball will not turn.
chart (figs. 32 and 3-11 ).
(4) Turn the sleeve-holding screw back one-
c. Remove the slide-wire cover.
eighth to one-quarter turn.
d. Using a small soft brush, electric blower, or a
(5) Screw the penpoint assembly into the ink
vacuum cleaner, carefully clean the slide and trol-
barrel.
ley wires, the chart roller, pen and pen carriage,
(6) Fill the pen by holding it in the left hand
chart guide rods and the recorder scale. Use a lint
at a 45 angle, insert the spout of the ink tube
free cloth and alcohol to remove any ink deposits
into the pen barrel until the spout touches bottom.
on the pen, pen carriage, or pen carriage shaft.
Squeeze the tube until the barrel is three-fourths
Operate the manual chart advance knob, as re-
full of ink, Remove the spout.
quired, to gain access to all parts of the chart
(7) Place the rubber washer on the pen cap
roller.
and screw the pen cap into the ink barrel.
e. Using a pin or toothpick, apply one drop of
(8) Place the pen on the pen carriage and
light low temperature machine oil to the oilholes
tighten the setscrew (fig. 39). Be sure the ink
in the ratchet wheel hubs of the multiple speed
barrel is in a vertical position.
recorders (figs. 31 and 33). Rotate the manual
(9) Remove the pen cap from the ink barrel.
chart advance knob three turns to circulate the
lubricating oil.
(10) Place the pen heater (fig. 3-9) on the
ink barrel.
(11) Screw the pen cap into the ink barrel.
chart drive motor mounts, and all panel knobs.
TM
6660-204-25-32
|
|
Privacy Statement - Press Release - Copyright Information. - Contact Us |
