 |
|||
|
|
|||
|
|
|||
| ||||||||||
|
|  TM 11-5820-695-35
pair of these assemblies is piece part replacement. Parts
(2) Remove the 11 screws securing the bottom
location and wiring diagrams for plug-in components
cover on amplifier-frequency multiplier 2A10 and remove
1A14A1 through 1A14A6 are shown In figures 4-24
the cover.
through 4-35.
Electrical parts location on electrical
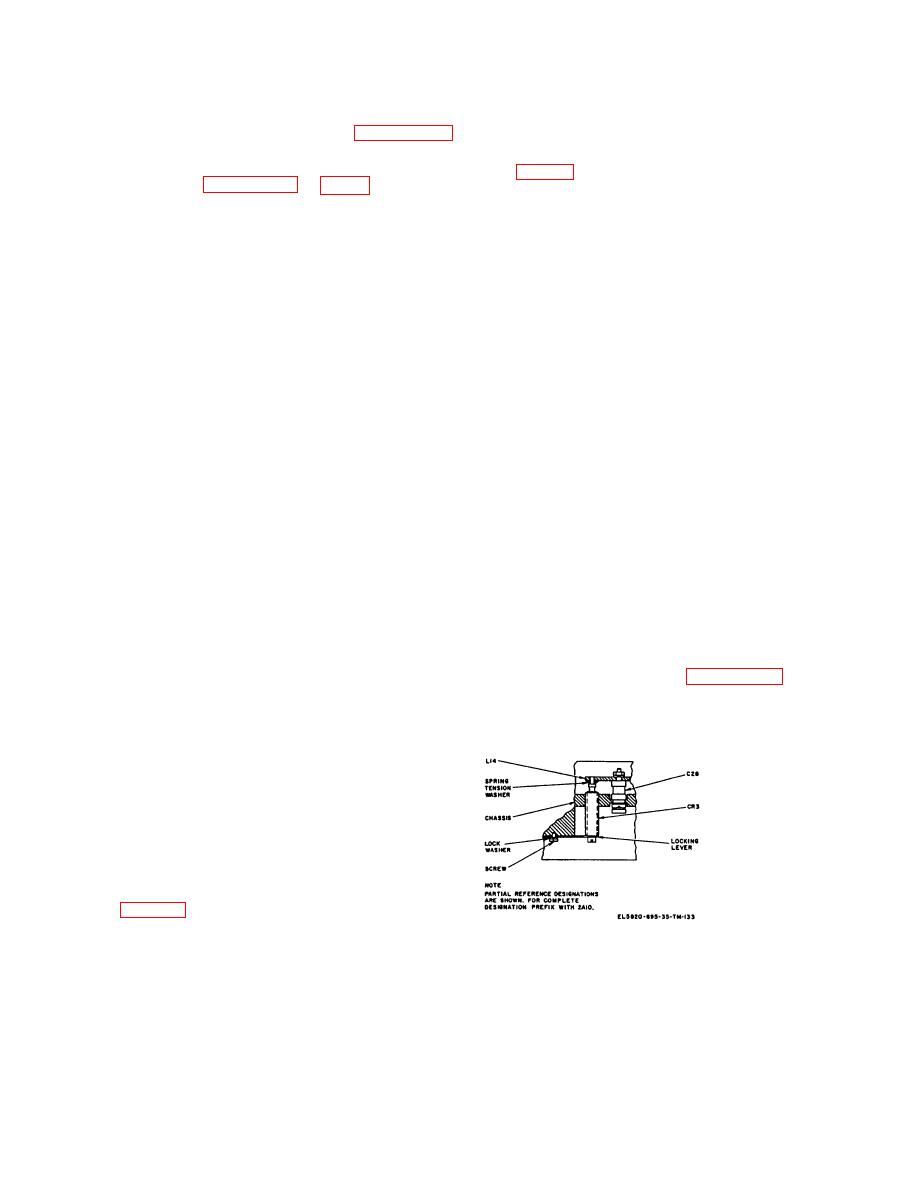
(3) Remove the screw, lockwasher, and locking
equipment chassis 1A14A10 and printed wiring board
lever (fig. 4-4) for diode 2A10CR3, on the bottom side of
1A14A9 is shown in figures 4-22 and 4-23. No special
chassis.
instructions are required for depot level disassembly and
(4) Unscrew diode 2A10CR3; remove and
piece part replacement.
discard it. Retain the spring tension washer.
4-10. Repair of Amplifier-Mixer 2A7
b. Replacement of Varactor Diode 2A10CR3.
Depot repairs to amplifier-mixer 2A7 (fig. 4-41) consists
(1) Screw in the replacement varactor diode
of replacement of defective parts. Special consideration
noting when the spring tension washer comes into contact
must be given to the replacement of matched pair crystal
with surface of inductor 2A101A14. Continue rotation of
diodes 2A7ZICR1 and 2A7Z1CR2 as indicated below.
the diode only one-half turn beyond this point.
CAUTION
(2) Replace the locking lever, lockwashers and
Before handling crystal diodes,
nut removed in step a(3).
ground yourself to equipment case
(3) Replace bottom cover on amplifier-
ground to dissipate any existing static
fr6quency multiplier 2A10 and secure with the 11 screws
charge.
moved in a(2).
a. Removal of Crystal Diode fA7ZICRI or
(4) Replace top cover on 2A10 and secure in
2A7Z1CR2.
place using the 18 screws removed in a(1). Start with
(1) Using a screwdriver, unscrew and remove
screws in center and work outward. Tighten screws to
the diode cover screw covering the defective crystal
torque of 40-50 inch-ounces.
diode.
4-11.1. Converter-Multiplier CV-3633/GRC-144(V), Unit
(2) Using long nose pliers, grasp the diode's base and
3
extract it from amplifier-mixer 2A7.
Converter-Multiplier CV-3633/GRC-144(V) contains five
(3) Pull diode from diode base.
plug-in assemblies 3A1, 3A2, 3A5, 3A6 and 3A8 that are
b. Replacement of Crystal Diode 2A7Z1CR1 or
replaceable at the organizational level and four
2A7Z1CR2.
assemblies 3A3, 3A4, 3ACR1 and 3A7HY1 that are
(1) Note cathode orientation when replacing
replaceable at the direct support level (para 3-53.3
the crystal diode. Orient the replacement crystal diode in
through 3-53.6). Depot repair of the CV-3633/ GRC-
accordance with the polarity shown in figure 4-41 and
144(V) consists of piece part and component
stamped on the assembly and insert crystal diode into the
replacement. Parts location illustrations of the CV-
diode base, insuring positive seating.
3633/GRC-144(V) are shown in figures 5-108 through 5-
(2) Insert diode (with base) into amplifier mixer
118. There are no special instructions required for depot
2A7.
level disassembly and piece part replacement for the
alarm-monitor 3A1, power supply 3A6, electrical
(3) Replace and firmly secure diode cover
equipment chassis 3A7 and
screw.
4-11. Repair of Amplifier-Frequency Multiplier 2A10
Amplifier-frequency multiplier 2A10 (fig. 6-95) depot
repair is the replacement of defective part. Special
instructions for removal and replacement of varactor
diode 2A10CR3 are provided below.
a. Removal of Varactor Diode 2A10CR3.
(1) Remove the 18 screws securing the top
cover on amplifier-frequency multiplier 2A10 and remove
the cover (fig. 5-95).
Figure 4-4.
Amplifier frequency multiplier 2A10
varactor diode replacement.
Change 6
4-6
|
|
Privacy Statement - Press Release - Copyright Information. - Contact Us |
