 |
|||
|
|
|||
|
Page Title:
Isolating Troubles in Plate Assembly 1A16 |
|
||
| ||||||||||
|
|  TM 11-5820-695-35
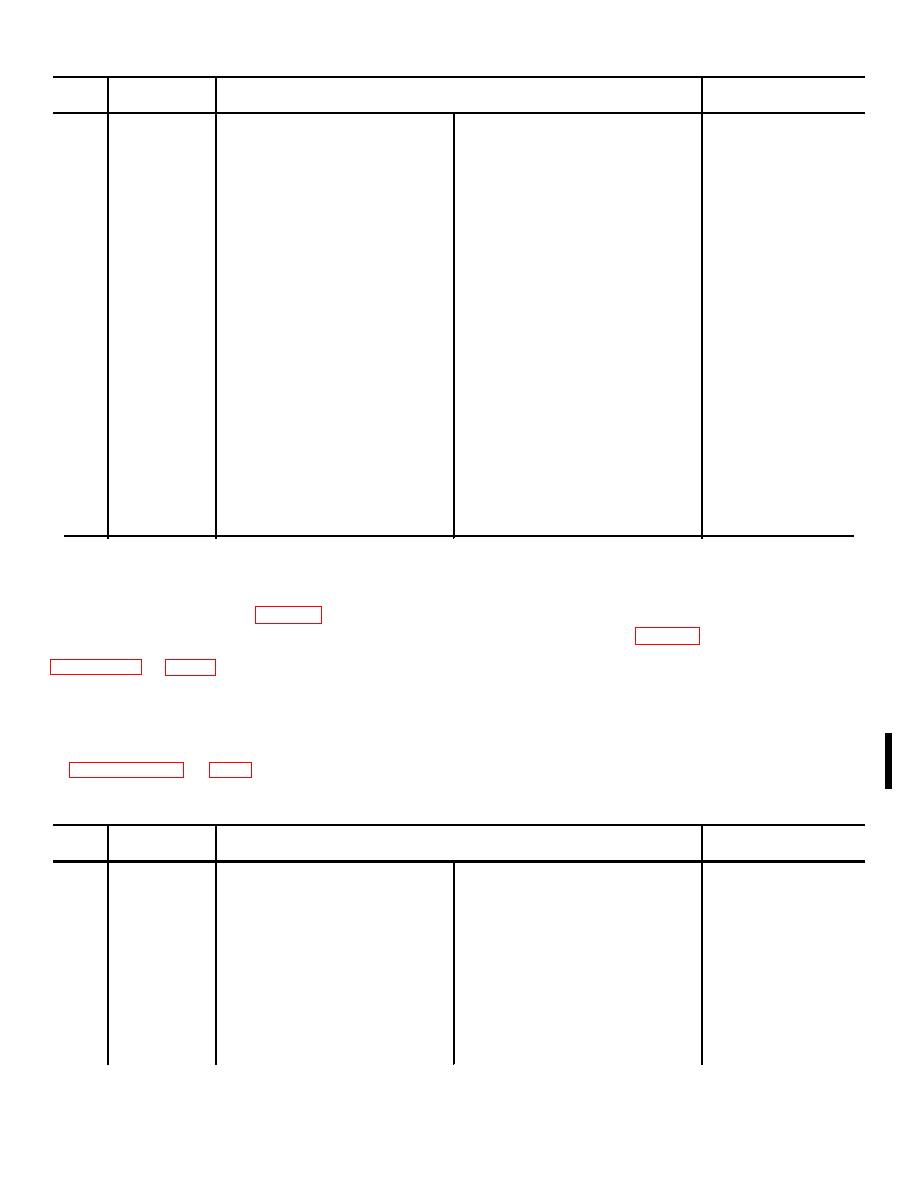
Connect multimeter leads between
Multimeter indication
Section
Step
pin
and
pin
(ohms)
9
a
1A1A13XA10-5
1A1A13J10
604K 6K
b
-5
1A1A13P2-13
Zero
c
-5
-15
Zero
d
-8
1A1A13XDS10-2
Zero
e
1A1A13XA10-8
1A1A1P2-32
Zero
f
-8
-34
Zero
g
-9
-34
Zero
h
-13
-15
Zero
i
-13
1A1A13XDS10-1
220 22
j
-14
1A1A13P1-14
Less than 1
k
-15
-33
Zero
10
a
1A1A13XA11-7
1A1A13J11
1.1 M 55K
b
-7
1A1A13P2-16
Zero
c
-8
1A1A13XDS11-2
Zero
d
-8
1A1A13P2-35
Zero
e
-13
-16
Zero
f
-13
1A1A13XD11-1
470 47
g
-14
1A1A13P1-16
Less than 1
h
-15
-35
Zero
11
a
1A1A13XA12-7
1A1A13J12
1.1 M 65K
b
-7
1A1A13P2-18
Zero
c
-8
1A1A13XDS12-2
Zero
d
-8
1A1A13P2-37
Zero
e
-13
-18
Zero
f
1A1AlSXA12-13
1A1A13XDS12-1
470 47
g
-14
1A1A13P1-18
Less than 1
h
-15
-37
Zero
b.
Procedure.
3-10. Isolating Troubles in Plate Assembly 1A16
(1) Refer to the chart (c below). Connect
a.
Preparation of T-1054(P)/GRC-144(V) Refer
the multimeter leads between the two pins listed in the
to the troubleshooting chart (para 3-6b) and determine
steps of the sections that were referenced in the
those sections of the plate assembly 1A16 checks to be
troubleshooting chart (para 3-6b). If the troubleshooting
performed. Refer to the chart given in c below and
chart indicates a section but does not give a step
number, perform all of the steps given in that section
be removed to gain access to the connector pins. Do
starting with step a.
not remove plate assembly 1A16. Procedures for
(2) Observe that multimeter indication is
removal of components 1A2 through 1A11 are given in
within the tolerance specified in the chart for each step.
TM 115820-695-12. Procedures for removal of power
If it is not, refer to the T-1054(P)/GRC-144(V) or T-
supply 1A1 or composite assembly 1A13/1A14 are given
1054(P)A/GRC-144(V) interconnecting diagram (figs 5-
in paragraphs 3-22 and 3-30.
15 or 5-15.1) and determine whether the fault is
defective wiring or a defective circuit element.
c.
Plate Assembly 1A16 Checks Chart.
Connect multimeter leads between
Multimeter indication
Section
Step
pin
and
pin
(ohms)
1
a
1A1l6W25XA2-1
1A16A8XDS10-A
Zero
b
-2
-D
Zero
c
4
1A15W27XA1B-15
Zero
d
-4
-34
Zero
e
-5
1A15E1
Zero
2
a
1A16W25XA3-5
1A15E1
Zero
b
1A16W25XA3-10
Zero
c
-7
-11
Zero
d
-8
A16W25XA8-8
Zero
e
-9
1A16W25XA5B-A3
Zero
f
-10
1A16W26XA4-8
Zero
g
-11
1A15A8S4B-3
Zero
Change 6 3-15
|
|
Privacy Statement - Press Release - Copyright Information. - Contact Us |
