 |
|||
|
|
|||
|
Page Title:
Section XXIX. DVE POWER CABLE INSTALLATION |
|
||
| ||||||||||
|
|  TB 9-2320-280-35-5
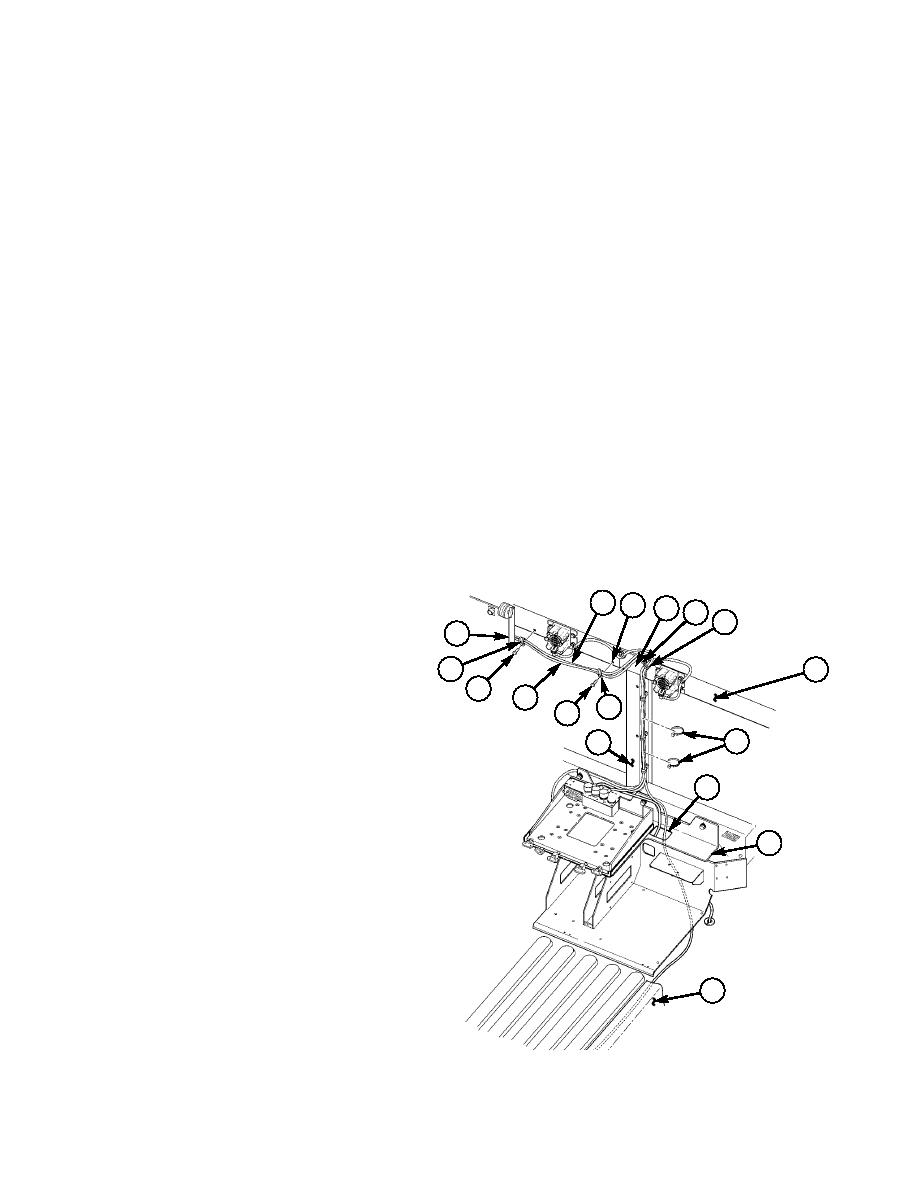
Section XXIX. DVE POWER CABLE INSTALLATION
29-1. Route DVE power cable (2) from DCM mount (1) to center of windshield center support (12),
through access cutout (9) in integrated radio rack (10), and under tunnel insulation (11) to rear of
battery box.
29-2. Attach shrink tubing (19) and two terminal lugs (18) and (22) to DVE power cable
negative lead (21) and DVE power cable positive lead (20). (Refer to TM 9-2320-280-20 for terminal
connector repair.)
29-3. Attach DVE power cable positive lead (20) to 24V terminal board (24) with existing nut (17).
29-4. Attach DVE power cable negative lead (21) to ground strap (23) with existing nut (25).
29-5. Secure all leads together with tiedown strap (8).
29-6. Remove two existing screws, lockwasher, and washers from DCM mount (1) and windshield
frame (7).
29-7. Secure two cables (2) and (15) on windshield frame (7) with clamp (16) and screw (14).
29-9. If required, locate, mark, and drill 0.147-inch diameter hole (3) in windshield frame (7).
29-10. Secure two cables (2) and (15) with clamp (13) and screw (14) on windshield frame (7).
29-11. Remove screw (5) and clamp (6) from windshield wiper bracket (4).
29-12. Secure two cables (2) and (15) with clamp (6) and existing screw (5).
29-13. Secure two cables (2) and (15) to existing cables with tiedown straps (8).
29-14. Install right side tunnel insulation. (Refer to TM 9-2320-280-20-3.)
29-15. Install batteries. (Refer to TM 9-2320-280-20-2.)
2
3
4
5
6
1
~
16
7
14
15
13
14
8
12
9
10
2.
DVE POWER CABLE 3256881-1 QTY. 1
8.
TIEDOWN STRAP MS3367-1-0 QTY. A/R
13.
CLAMP MS21333-76 QTY. 1
11
14.
SELF-TAPPING SCREW 9421073 QTY. 2
16.
CLAMP MS21333-104 QTY. 1
Figure 5-138.
|
|
Privacy Statement - Press Release - Copyright Information. - Contact Us |
