 |
|||
|
|
|||
|
Page Title:
Frequency Changing and Alignment Procedures. |
|
||
| ||||||||||
|
|  coupler) for maximum (peak) indication on the test Set
2-7. Frequency Changing and Align-
meter.
ment Procedures.
(11) Release PUSH TO TALK switch.
The ten position (0 through 9) CHAN switch on the
(12) With alignment tool, adjust squelch (SQ
front panel provides ten preset sequential channels spac-
ADJ) control on i-f/a-f module counterclockwise until
ed 200 kHz apart over a 2 MHz bandwidth. Any portion
noise is heard.
of the 30.00 MHz to 79.95 MHz range can be selected by
(13) Slowly turn SQ ADJ control clockwise until
changing the three switches (A, B, and D) on the syn-
receiver quiets, then advance control one full turn
thesizer module and the CHAN switch on the top panel
clockwise.
of the radio set. (Refer to table 2-1 or table 2-2 for fre-
(14) Return CHAN switch to channel originally
quencies and their respective switch settings). Whenever
selected.
the frequency of a radio set is changed (excluding the
(15) Set PWR OFF/ON/SQUELCH DIS switch
ten preset channels), the transmitter module and anten-
to PWR OFF.
na coupler module must be realigned to ensure proper
(16) Remove battery.
matching and maximum power transfer of the radio set
(17) Reinstall alignment tool on module cover.
to the antenna.
(18) Reassemble unit (para 2-6).
a. Changing Frequency. To change the frequency
c. Frequency Chart (Battery). To use the chart in
of the radio set, perform the following:
(1) Disassemble unit (para 2-5).
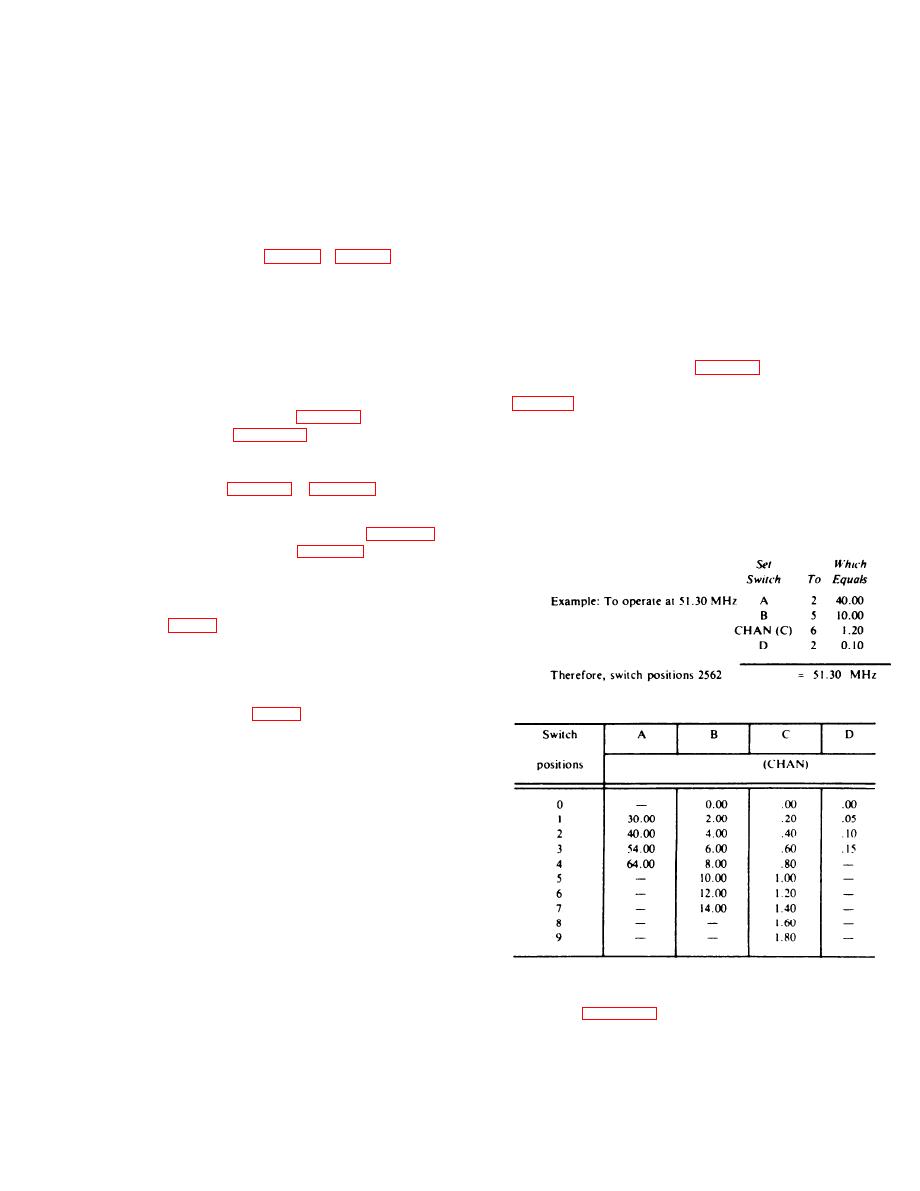
switch in turn, that comes closest to (but not over) the
(2) refer to figure 2-2. Set synthesizer switches,
desired frequency. Then add the values of the switches
with the enclosed alignment tool (or JFD 5284 align-
(A, B, CHAN (C), and D) to determine the operating
ment tool), and the top panel CHAN switch, to the new
frequency. By using the proper combination, any fre-
frequency using table 2-1 or table 2-2, as applicable.
quency between 30.00 to 79.95 MHz (in 50 MHz steps)
may be selected.
NOTE
The frequency chart shown in table 2-1 is
printed on the battery. Table 2-2 is a complete
listing of all frequencies including degraded
(low sensitivity) channels.
(3) Set the transmitter switch and antenna coupler
switch (fig. 21) with the enclosed alignment tool to the
same position as switch A on the synthesizer module.
(4) Connect battery.
has been changed, perform the following procedures for
Table 2-1.
Frequency Chart (Printed on Battery)
radio set alignment (fig. 2-1 ):
(1) Install antenna (either short or long).
(2) Set CHAN switch to 5.
(3) Preset Cl on the transmitter module fully
clockwise (use enclosed alignment tool of JFD 5284).
(4) Set PWR OFF/ON/SQUELCH DIS switch to
ON.
(5) Press push-to-tune switch (on side of radio
set) and adjust VOL control for comfortable level.
(6) Using the alignment tool, adjust C1 on the
transmitter module counterclockwise for the lowest
tone.
(7) Release push-to-tune switch.
(8) The antenna coupler adjustment (L1) must be
made using Test Set TS3354/PRC-68 (test set),
(a) Remove cover from test set.
d. Frequency Chart (Switch Code). T h e f o l l o w i n g
charts in table 2-2 may be used to determine an
(c) Set FUNCTION switch to FSM position.
operating frequency from the synthesizer switch codes
(9) Hold radio set so the antenna is approximately
or the synthesizer switch codes from a known frequen-
6 to 24 inches from FSM antenna on test set.
c y . (Each chart covers a 2 MHz band). To find the
(10) Press PUST TO TALK switch on radio set
and use alignment tool to adjust L1 (located on antenna
Change 1
2-3
|
|
Privacy Statement - Press Release - Copyright Information. - Contact Us |
